
How to deploy your own Unity games to Ouya
Overview
You've got one or more samples from the Ouya Unity plug-in deployed to your Ouya console and you're feeling good. Now it's time to get real. This is a much shorter and easier tutorial than the initial setup was, as the vast majority of the work is one-time stuff.
Prerequisites
This tutorial is meant as a direct follow-up to How to set up Unity for Ouya Deployment. If you don't have your Ouya set up for Unity development, start with that tutorial. This tutorial isn't specific to PC/Windows, so don't run away if you're on a Mac.
1. Export your very own Ouya "Core" Unity package
The first step is an easy one-time task. In Unity, pull up the Ouya Unity plug-in samples project. Select the OUYA menu up top and then "Export Core Package." This will create the file "OuyaSDK-Core.unitypackage" in the root folder of the plug-in. In other words, it'll be in your ouya-unity-plugin-master folder. Mine was 1.8 MB. Now you can import just that package into your own Unity projects to enable Ouya support.
2. Import the Ouya "Core" package into your own Unity project
In Unity, create or open a project you want to deploy. It can be as simple as some text "Hello, world!" in the middle of the screen, or whatever you feel like. For my first "I'm on my own" test, I created a spinning white cube against the default blue background. Fancy!
Import the package from Step 1. If you've used Unity for more than 18 seconds, you've probably imported a package, so you know the drill.
Assets -> Import Package -> Custom Package, then select OuyaSDK-Core.unitypackage. Go ahead and import everything.
3. Add a custom Ouya icon
This is optional for now, but at some point you will want to provide your own icon that shows up in the Ouya PLAY and DISCOVER areas. You don't do that in the normal icon build options; you just overwrite a special PNG file in your project.
So if you want to go ahead and do that, create your own 732 x 412 PNG file and name it ouya_icon.png. It looks like a lot of people leave out text and important content from the bottom 25% or so of the thumbnails. The reason is that when you select a game in the PLAY menu, the Ouya will overlay a solid orange bar and the name of the game at the bottom of the thumbnail image.
If you're lazy and just want to see a custom icon appear, you can use this one for testing:
In File Explorer (or Finder if you one of *those* people), overwrite the default ouya_icon.png in your Unity project here:
/Assets/Plugins/Android/res/drawable-xdhpi/
NOTE: If you submit your project as an "app" rather than a game, there's an app_icon.png in the \drawable folder you can overwrite, but why would you want to do an app when you can do a game?
4. Add an OuyaGameObject to your scene
Every Unity scene will need an Ouya SDK GameObject called OuyaGameObject running. Note that that does not mean you need to manually drag one into every scene, you just need to have one initially going.
In the project hierarchy, go to Ouya -> SDK -> Prefabs and drag an OuyaGameObject into your scene. In a full game, you'd likely have a startup scene that contains the OuyaGameObject. Its script calls DontDestroyOnLoad() in its Start method, so you only have to have the OuyaGameObject in your first scene.
At this point, you may want to change the DEVELOPER_ID value to your own. You may also want to uncheck "Use Legacy Input" if you want to do input similar to the samples.
5. Configure project settings
In Unity, go to Edit -> Project Settings -> Player and press the Android button under Per-Platform Settings.
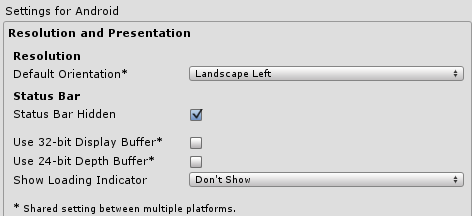
Expand Resolution and Presentation. Choose "Landscape Left" for the Default Orientation and uncheck Use 32-bit Display Buffer. Actually, I'm not 100% sure that last step is necessary; I'll need to look that up.
Now expand Other Settings and in the Identification section, fill in your own custom Bundle Identifier and set the Minimum API Level to 16 as before.
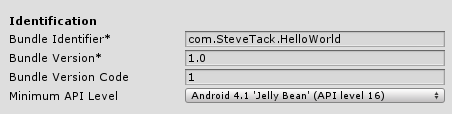
The Bundle Identifier can be a source of issues before you know how everything works. As an experiment when things weren't working, I used the value from the sample for the Bundle Identifier:
tv.ouya.demo.OuyaUnityApplication
But you'll want to set your own. I ended up changing it to:
com.SteveTack.HelloWorld
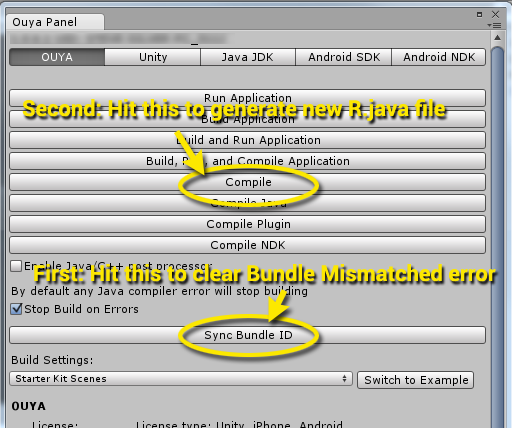
Now the next step is VERY important. If you don't regenerate a special Java class after changing the Bundle ID, your game will immediately crash when you run it on your Ouya. Nice, huh?
Pull up the Ouya Panel (Window -> Open Ouya Panel) and under "OUYA" you will likely see a "Bundle Mismatched" error drawn over the screen. Hit the Sync Bundle ID button. Then hit the Compile button. Some command prompt windows will appear and a brand new R.java file will be generated. I don't honestly know what is, just that if you don't do this step, you will be unhappy!
Now in Unity, you'll see each part of the Bundle ID you used as a subfolder and an R.java file in the final folder, like this:
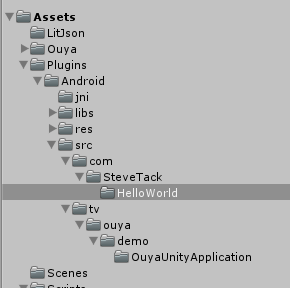
Notice that there's no automatic clean-up if you've done a build before changing the Bundle ID. The old one is still there. So you'll want to manually delete the default /tv/ouya/demo/OuyaUnityApplication/ structure if you've already done a build against the default settings.
Add a scene to your Build Settings. Obviously anything beyond "Hello, World" is going to have multiple scenes, so once you're rolling, add whatever you need to add.
6. Deploy your own Unity project to your Ouya
Make sure your Ouya is connected to your PC or Mac via USB, as in the previous tutorial. Now go to File -> Build Settings. Obviously you want Android selected. Hit Build and Deploy. Give each game a unique APK filename. After the build is complete and the APK transferred to your Ouya, you should see your game running!
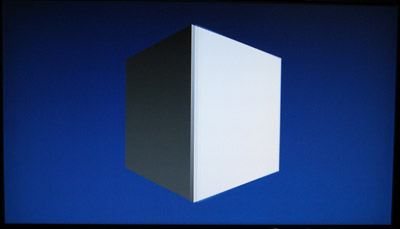
Rarely has a spinning white cube represented such excitement for future possibilities. Well, it's exciting to me. Don't look at me like that.
Go to the PLAY menu to check out your custom icon. Ooo-yeah indeed.
For the next tutorial, I'd like to cover actually deploying to the Ouya marketplace. Assuming I ever get around to that, I'll document the process and link to that tutorial here! In the mean time, have fun making cool crap!